
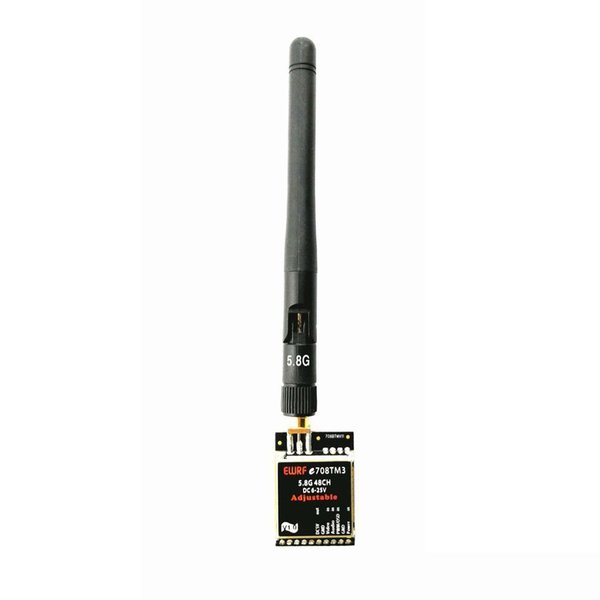
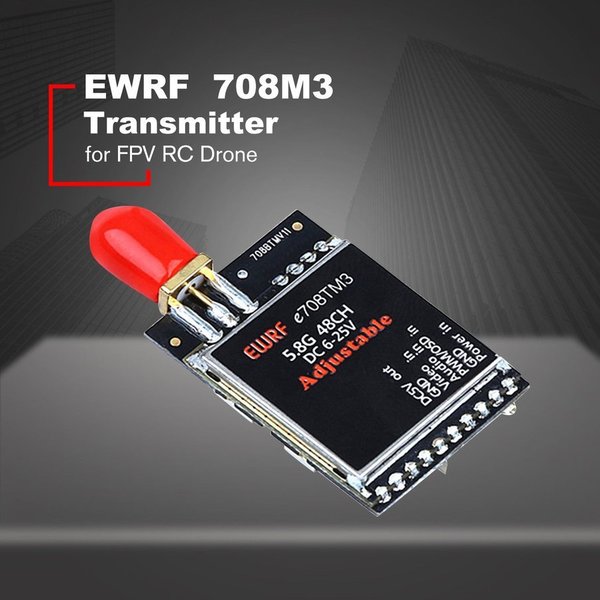

EWRF Transmitter Sender FPV E708TM3 5.8G 48CH " 25mW 200mW 600mW " AV Drone
Beschreibung
Beschreibung:
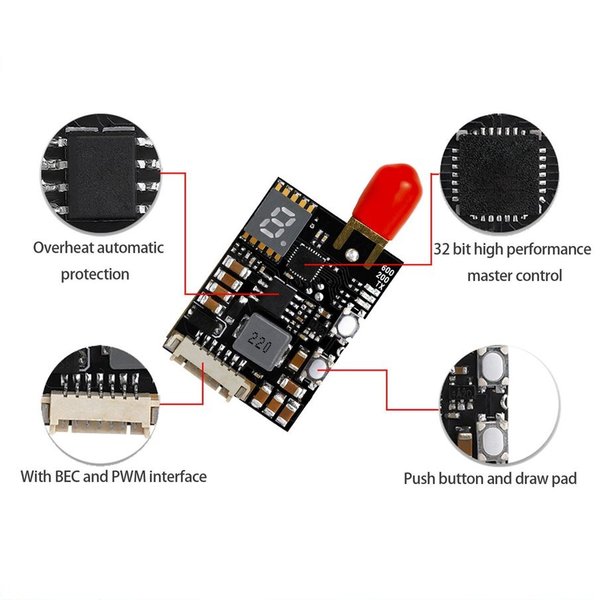
- Einstellbare 4 Modi: 25 mW / 200 mW / 600 mW / AUS
- BEC 5V Ausgang für Kamera, RC Empfänger
- Selbstversorgung und Kanalumschaltung ohne Störung durch andere
- Schutz vor Überhitzung bei vorzeitiger Beschädigung.
- Zusätzlicher Schutz ermöglicht das Einschalten ohne Antenne
- Pitmode (Stromversorgung ist auf OFF gestellt) - Testen und konfigurieren Sie Ihr Quad ohne Störung durch andere
- PWM-Kanalwechsel und Pitmode-Einstellung
- OSD Beltflight-Einstellung in Bezug auf Leistung, Bänder, Kanäle und Pitmode (verbesserte Version)
- 2-6S Eingangsleistung unterstützt
Spezifikation:
- Modell: EWRF 708M3 (mit DC 5V Ausgang)
- Frequenz: 5,8G 48CH
- Sendeleistung: 25 mW / 200 mW / 600 mW / AUS
- Stromversorgung: DC 6-25V (2-6S)
- Versorgungsstrom (12 V): 140 mA (25 mW) / 250 mA (200 mW) / 300 mA (600 mW)
- Ausgangsleistung: DC 5V (max. 1A)
- Antennenimpedanz: 50 Ohm
- Antennenanschluss: RP-SMA-Stecker
- Gewicht: 8 g
Größentabelle:
- Ca. 22 x 32 x 7,5 mm / 0,86 x 1,25 x 0,29 Zoll
Das Paket beinhaltet:
EWRF-e708TM3 FPV Audio Video Sender 1 Stück
EWRF e708 TM3 5.8G AV TX OSD Setting
EWRF e708TM3 , a power adjustable 5.8G Audio/Video transmitter, is the enhanced version
of 7086TM3. It only adds OSD setting of AV TX compared to 7086TM3.It works well with
several other commonly used Betaflight/Cleanflight FCs when using OSD setting. Almost all F3
and F4 targets (except for those with integrated VTX) are supported.
Below is the guide on how to use OSD setting to change your AV transmitter’s parameters.
e708TM3 only supports setting of bands, channels, power and Pitmode at the present.
1.Connecting and configuration
1.1 For F3/F4 with a integrated OSD
Wire three pins PWM/OSD, VIDEO IN and GND of e708TM3 to Tx of an Uart, VIDEO
OUT and GND of the FC respectively. Then connect the FC to a PC with USB, running the
Betaflight ( Release 3.1 or later).
1.2 For F3/F4 without OSD
First, download MWOSD Release 1.6.5.0 or later which supports the CMS with
CANVAS extension for the external OSD. Make sure that ‘CANVAS_SUPPORT’ and
‘BETAFLIGHT’ option in Config.h are enabled.
Wire three pins PWM/OSD, VIDEO IN and GND of e708TM3 to Tx of an Uart port,
VIDEO OUT of OSD and GND of the FC respectively. Then connect the FC to a PC with USB,
running the Betaflight ( Release 3.1 or later).
1.3 Port Configuration
Open Ports tab, selecting TBS SmartAudio from Peripherals drop down menu on
the port which e708TM3 is connected to.Speed can be left at AUTO.
Picture 1 Port configuration
2. Selecting Band、Channel and Power
2.1 Getting into the OSD CMS(Configuration Menu System)
When Powering up the e708TM3,FC and the screen with a video receiver,there will be
information on the screen shown in the picture 2 below:
Picture 2 Betaflight Menu
Operate Throttle middle, Yaw left and Pitch up getting into the OSD CMS(see picture 3 below).
Picture 3 OSD CMS menu
2.2 Selecting Band and Channel
Using up and down the Pitch stick to move the cursor to FETURES and selecting it by Roll right,
getting into the FEATURE Menu shown as picture 4 below:
Picture 4 FEATURES menu
Select VTX SA the same way to get into VTX setting menu shown below:
Picture 5 Band and channel setting
On the menu in Picture 5,use left and right Roll stick to choose the band and the channel.
Notes: e708TM3 AV transmitter supports 48 channels ,so you can choose any channel
among them to work using the button or PWM setting. But at present, the OSD setting of
Betaflight/Cleanflight only supports 40 channels. That means you cannot choose additional 8
channels by the OSD setting.
After choosing the band and channel, please move the cursor to the SET and select YES to
confirm your setting(see picture 6) .
Picture 6 Confirm the setting of band and channel
3、Selecting transmitting power
Follow the same directions as that in the previous section to POWER item. Use left and right
Roll stick to choose the power.
e708TM3 supports only three transmitting powers of 25mw,200mw and 600mw so far, but
there are four power options of 25mw,200mw,600mw and 800mw in the menu of OSD setting.
When you make power selection , please note that the selecting of 500mw or 800mw all means
that e708TM3’s power is set to 600mw .
Notes: Power setting is effective immediately which is different from the setting of the band
and channel.
Picture 7 Power setting
4. Pitmode Setting
Pitmode is a new feature which means that the transmitter is working at the very low
amplitude of power, it allows the user to power up the video transmitter to change the setting or
do some testing without interfering with others. When working in Pitmode, the AV transmitting
distance is only within 1-2 meters .
First, move the cursor to CONFIG in the menu shown in the picture 7 , then select to enter
the menu of PITMODE setting shown in picture 8.
Picture 8 Pitmode setting
Use up and down the Pitch stick to move the cursor to PIT FMODE, toggle the Roll to the left
to exit the Pitmode. PIR will display on the screen.Toggle to the right to enter the Pitmode. POR
will display correspondingly.
Notes: After powering up the e708TM3 and FC again, Pitmode status will be saved even if
the default PIR will display on the screen after powering up.Ignore “POR or PIR” if it appears on
the screen.. The best way to judge the Pitmode status is to see the LED indication on the
e708TM3. Keep it in the mind that Pitmode is in effect only when TX LED twinkles( on and off
alternatively), TX LED on or off constantly indicates that the AV transmitter is in normal mode.
5. e7086TM3’s indicator
There are two types of indicators on the e7086TM3 for indicating the working status: one
mini digital 8 display and 3 LED lights marking TX,200mw and 600mw respectively.
5.1 Band and channel display
The digital 8 display indicates the band and channel which the transmitter is working
on.Refer to the chart below for frequencies of band and channel:
BAND CH1 CH2 CH3 CH4 CH5 CH6 CH7 CH8
A(BOSCAM) 5865M 5845M 5825M 5805 M 5785 M 5765 M 5745 M 5725 M
b(BOSCAM) 5733 M 5752 M 5771 M 5790 M 5809 M 5828 M 5847 M 5866 M
C(BOSCAM) 5705 M 5685 M 5665 M 5645 M 5885 M 5905 M 5925 M 5945 M
d(FATSHAR) 5740 M 5760 M 5780 M 5800 M 5820 M 5840 M 5860 M 5880 M
E(RACEBAN) 5658 M 5695 M 5732 M 5769 M 5806 M 5843 M 5880 M 5917 M
F 5362M 5399M 5436M 5473M 5510M 5547M 5584M 5621M
Notes: Channel in the F band(in italics) aren’t supported by
Betaflight/Cleanflight OSD setting at present.
5.2 Working status indicator
TX LED flashes ( on and off alternatively ) to indicate the PITMODE is in effect. TX LED
constantly on or off, indicates that the AV transmitter is in normal mode .
When 25mw is selected,only TX LED is on.When 200mw is selected,two lights of TX and
200mw LED are on. When 600mw is selected, all the three lights of TX,200mw and 600mw
LED are on.
6. Button and PWM setting
6.1 Power setting
Press and hold the button P to choose the power of 25mW/200mW/600mW.
Use two short press to turn on/off the transmitting(PITMODE setting) and
then the TX LED will be twinkles or not respectively. When power is set to
OFF(PITMODE is effective), you can set bands and channels without
interference to others.The AV transmitting distance is only within 1-2 meters
when it is in Pitmode.
Only the TX LED is on when the power is set to 25mW,both two lights of TX
and 200mW LED are on when set to 200mW, All three lights TX,200mW and
600mW are on when set to 600mW.
2. Band and channel setting
Presss and hold the button C to choose the band A-b-c-d-E-F(circle).
Press the button repeatedly to choose the channel 1-8(circle).
When PWM port is connected with a RC receiver, it can been used to change
AV channels 1-8 and to shut transmitting by a RC( PITMODE in effect). Make
sure that there is a PWM signal from receiver within 3 seconds after
powering up ,otherwise the transmitter is back to button-press setting
mode . When in the setting mode of PWM, the dot on the digital display will
glow